Contents
- 1 Why Is My Toilet Running – How to Fix It
- 2 How it works
- 3 Reconnect the fill tube
- 4 Adjust the fill height
- 5 Adjust the flapper chain
- 6 Test the flapper
- 7 Replace the flapper
- 8 Don’t ignore a rocking toilet
- 9 Flush the fill valve
- 10 Replace the fill valve
- 11 How it works
- 12 Reconnect the fill tube
- 13 Adjust the fill height
- 14 Adjust the flapper chain
- 15 Test the flapper
- 16 Replace the flapper
- 17 Don’t ignore a rocking toilet
- 18 Flush the fill valve
- 19 Replace the fill valve
Why Is My Toilet Running – How to Fix It
Stop constant running — and most other malfunctions — in just a few minutes
Toilet trouble is inevitable. Sooner or later, every toilet will lose flushing power, run constantly or develop a bad habit like making you hold down the lever to achieve a full flush. Luckily, toilets are simple contraptions, so you don’t need a plumber to fix most problems.
How it works
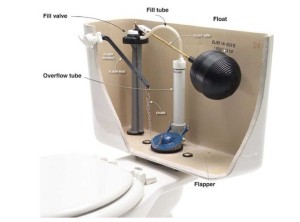
When you push the flush handle, you raise the flapper and all the water in the tank gushes into the bowl. Then the flapper closes and the tank refills.
Fill tube
After a flush, most of the water passing through the fill valve refills the tank. But some water runs through the fill tube and through the overflow tub to refill the tank.
Float
As the tank refills after a flush, the float rises and closes the fill valve. Most newer fill valves are connected to a small float (see following photos) rather than a big “ball float” like this one.
Fill valve
After a flush, the lowered float opens this valve to refill the tank. When a fill valve doesn’t close completely, the toilet runs constantly.
Overflow tube
The overflow tube prevents the tank from overflowing and flooding your bathroom. If the fill valve doesn’t close, for example, the incoming water will spill into the tube and down into the tank-rather than over the tank and onto your floor.
Flapper
Pushing the flush handle raises the flapper; that allows water to gush into the bowl. A flapper that doesn’t open completely causes a partial flush. A flapper that doesn’t seal tightly when closed causes the toilet to run costantly.
Reconnect the fill tube
If the fill tube gets disconnected or misaligned, it will squirt water into the tank rather than into the overflow tube. The bowl won’t refill completely and your next flush will be wimpy. So make sure it’s firmly connected to both the overflow tube and the fill valve.
Adjust the fill height
The water level in the tank is adjusted by adjusting the float. If water level is too low, you’ll get a weak flush. If it’s too high, water will spill over the overflow tube, the fill valve won’t close and the toilet will run constantly. To adjust a newer float, pinch the clip and slide the float up or down on the rod. With an old-style float, bend the float arm to raise or lower the float. Either way, you’ll have to test-flush and refill a few times to get it right. Most overflow tubes are marked to indicate the correct water level.
Adjust the flapper chain
The flush handle raises the flapper via a rod and a chain. The chain should have just a little slack in it when the flapper is closed. If the chain is too long, you’ll have to hold the handle down to get a complete flush. If the chain is too short, the flapper won’t seal when it closes and the toilet will run constantly. To adjust the chain, just move the clip to a different link. If the chain is much longer than necessary, cut off the excess to avoid tangles.
Test the flapper
A worn flapper that no longer seals properly allows water to constantly seep down into the bowl. And that’s the most common cause of a running toilet. To check the flapper, press lightly on it with a yardstick and listen for a minute. If the sound of running water stops, you know that the problem is related to the flapper. But before you replace the flapper, run your finger around the opening the flapper rests on. Mineral deposits on the rim of this opening will prevent the flapper from sealing. In that case, scrubbing the deposits away with an abrasive sponge or pad may solve the problem (don’t use anything that might roughen the rim). If not, replace the flapper.
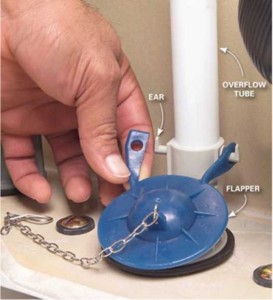
Replace the flapper
Swapping out a flapper is easy: Just unhook the chain and disconnect it from the ears on the overflow tube, then install the new one. But finding a new flapper may not be so easy. Turn off the water supply to the toilet at the shutoff valve below the tank. Then remove the flapper and search for a match. If you can’t find an exact match, buy two or three close matches. Even veteran plumbers sometimes have to try a few flappers before getting it right.
Don’t ignore a rocking toilet

If your toilet isn’t solidly fastened to the floor, there may be trouble in your future. Any movement of the toilet damages the wax seal. That leads to leaks and major repairs. To steady a rocking toilet, cut plastic shims to fit and slip them underneath (you may have to remove caulk before adding shims). Then caulk around the toilet and snug down the nuts on the bolts. But don’t crank them down super-tight; that can crack the toilet.
Flush the fill valve
If your toilet won’t stop running and none of the fixes above solve the problem, the only possible culprit is the fill valve. If you have a fill valve similar to the one shown here, turn off the water supply and remove the cap (by turning counterclockwise or removing a screw). Then turn on the water to flush debris out of the valve. Hold your hand over the valve so you don’t get a cold shower. Turn off the water, put the cap back in place and test. If flushing didn’t solve the problem, replace the valve.
Replace the fill valve
Installing a new fill valve is mostly a matter of following the enclosed directions. But there are a few things that aren’t in the instruction manual:
- Before you do anything, make sure the shutoff valve works so you can stop the water supply. If not, you’ll have to shut off the water at the main valve.
- Yes, you can (and should!) replace an old ball-float valve with a new-style valve. The new style is easier to install and adjust.
- When shopping, also pick up a new flexible supply line. Choose one that has a braided stainless steel sheath. Never, ever reuse an old flexible line. Flexible lines degrade over time and may eventually burst. If the existing line is solid metal tubing, you can reuse it but it will be more difficult to work with.
- The most common fill-valve mistake is to overtighten the connection between the supply line and the fill valve. Finger-tight, plus one quarter turn with pliers is usually enough. If it leaks, just tighten it a little more.
Stop constant running — and most other malfunctions — in just a few minutes
Toilet trouble is inevitable. Sooner or later, every toilet will lose flushing power, run constantly or develop a bad habit like making you hold down the lever to achieve a full flush. Luckily, toilets are simple contraptions, so you don’t need a plumber to fix most problems.
How it works
When you push the flush handle, you raise the flapper and all the water in the tank gushes into the bowl. Then the flapper closes and the tank refills.
Fill tube
After a flush, most of the water passing through the fill valve refills the tank. But some water runs through the fill tube and through the overflow tub to refill the tank.
Float
As the tank refills after a flush, the float rises and closes the fill valve. Most newer fill valves are connected to a small float (see following photos) rather than a big “ball float” like this one.
Fill valve
After a flush, the lowered float opens this valve to refill the tank. When a fill valve doesn’t close completely, the toilet runs constantly.
Overflow tube
The overflow tube prevents the tank from overflowing and flooding your bathroom. If the fill valve doesn’t close, for example, the incoming water will spill into the tube and down into the tank-rather than over the tank and onto your floor.
Flapper
Pushing the flush handle raises the flapper; that allows water to gush into the bowl. A flapper that doesn’t open completely causes a partial flush. A flapper that doesn’t seal tightly when closed causes the toilet to run costantly.
Reconnect the fill tube
If the fill tube gets disconnected or misaligned, it will squirt water into the tank rather than into the overflow tube. The bowl won’t refill completely and your next flush will be wimpy. So make sure it’s firmly connected to both the overflow tube and the fill valve.
Adjust the fill height
The water level in the tank is adjusted by adjusting the float. If water level is too low, you’ll get a weak flush. If it’s too high, water will spill over the overflow tube, the fill valve won’t close and the toilet will run constantly. To adjust a newer float, pinch the clip and slide the float up or down on the rod. With an old-style float, bend the float arm to raise or lower the float. Either way, you’ll have to test-flush and refill a few times to get it right. Most overflow tubes are marked to indicate the correct water level.
Adjust the flapper chain
The flush handle raises the flapper via a rod and a chain. The chain should have just a little slack in it when the flapper is closed. If the chain is too long, you’ll have to hold the handle down to get a complete flush. If the chain is too short, the flapper won’t seal when it closes and the toilet will run constantly. To adjust the chain, just move the clip to a different link. If the chain is much longer than necessary, cut off the excess to avoid tangles.
Test the flapper
A worn flapper that no longer seals properly allows water to constantly seep down into the bowl. And that’s the most common cause of a running toilet. To check the flapper, press lightly on it with a yardstick and listen for a minute. If the sound of running water stops, you know that the problem is related to the flapper. But before you replace the flapper, run your finger around the opening the flapper rests on. Mineral deposits on the rim of this opening will prevent the flapper from sealing. In that case, scrubbing the deposits away with an abrasive sponge or pad may solve the problem (don’t use anything that might roughen the rim). If not, replace the flapper.
Replace the flapper
Swapping out a flapper is easy: Just unhook the chain and disconnect it from the ears on the overflow tube, then install the new one. But finding a new flapper may not be so easy. Turn off the water supply to the toilet at the shutoff valve below the tank. Then remove the flapper and search for a match. If you can’t find an exact match, buy two or three close matches. Even veteran plumbers sometimes have to try a few flappers before getting it right.
Don’t ignore a rocking toilet
If your toilet isn’t solidly fastened to the floor, there may be trouble in your future. Any movement of the toilet damages the wax seal. That leads to leaks and major repairs. To steady a rocking toilet, cut plastic shims to fit and slip them underneath (you may have to remove caulk before adding shims). Then caulk around the toilet and snug down the nuts on the bolts. But don’t crank them down super-tight; that can crack the toilet.
Flush the fill valve
If your toilet won’t stop running and none of the fixes above solve the problem, the only possible culprit is the fill valve. If you have a fill valve similar to the one shown here, turn off the water supply and remove the cap (by turning counterclockwise or removing a screw). Then turn on the water to flush debris out of the valve. Hold your hand over the valve so you don’t get a cold shower. Turn off the water, put the cap back in place and test. If flushing didn’t solve the problem, replace the valve.
Replace the fill valve
Installing a new fill valve is mostly a matter of following the enclosed directions. But there are a few things that aren’t in the instruction manual:
- Before you do anything, make sure the shutoff valve works so you can stop the water supply. If not, you’ll have to shut off the water at the main valve.
- Yes, you can (and should!) replace an old ball-float valve with a new-style valve. The new style is easier to install and adjust.
- When shopping, also pick up a new flexible supply line. Choose one that has a braided stainless steel sheath. Never, ever reuse an old flexible line. Flexible lines degrade over time and may eventually burst. If the existing line is solid metal tubing, you can reuse it but it will be more difficult to work with.
- The most common fill-valve mistake is to overtighten the connection between the supply line and the fill valve. Finger-tight, plus one quarter turn with pliers is usually enough. If it leaks, just tighten it a little more.