Contents
Types of Wall Anchors
There’s a huge variety of wall fasteners available. Some are designed for solid walls, some for hollow walls. Choosing the right one will ensure that whatever you’re fastening stays there.
Two things will decide which type of wall fastener you need; the first is the strength of hold you require — book shelves, for instance, are going to need a much stronger hold than a picture frame — and the second is the kind of wall you’re fastening to.
Whether you’re fastening to solid walls (either plaster covered brick, stone, concrete, or some other kind of building block) or in hollow ones (plasterboard, lath and plaster, or wood panels fixed to a timber framework), screws are normally used. However, on their own, screws don’t grip in masonry, so you have to use some sort of plug.
Fastening to solid walls
Drill a hole, insert a wall plug, and then drive the screw into that As the screw penetrates, the plug expands and presses against the sides of the hole. So long as you don’t overtighten it (in which case the screw thread will destroy the plug) the screw will then be very firmly embedded indeed.
You must, though, ensure that the plug expands in solid masonry, rather than in the plaster coating, or in any mortar joins.
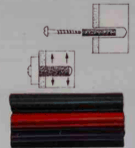
Standard wall plugs
![]()
Also made from plastic, these give a stronger grip than strip plugs. Designs vary, but all have slits or opening jaws to increase the degree to which the plug can expand, as well as fins and barbs to increase grip. The other advantage of this sort of plug is that, with most brands, one size of plug can take several sizes of screw, without reducing the fastening strength.
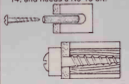
A special version of the standard plug for fastening structural lumber like door frames. It has a built-in brass screw.
Fibre plugs
![]()
These are made from compressed fibre with a built-in pilot hole for the screw. They come in various sizes and lengths, and to get a good grip both the hole and plug size must tally exactly with the size of screw. Refer to the manufacturer’s recommendations here.
Strip plastic plugs
Similar to fibre plugs, these are sold in 300mm (12in) lengths so you can cut off just the amount you need. Again, you must match the size of plug and the hole to take it, with the size of screw, and to help you the plug sizes are color coded. White is for screw gauges 4 and 6 and needs a hole drilled with a No 8 masonry bit; red is for gauges 6 and 8 and needs a No 10 bit; green is for gauges 8, 10 and 12, and needs a No 12 bit; and blue is for gauges 10, 12, and 14, and needs a No 16 bit.
Breeze block plugs
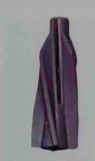
One thing ordinary plugs are not good at is gripping in soft or crumbling masonry, notably breeze block and aerated concrete block. Here a special plug is required. It consists of a central core surrounded by tough, flexible fins arranged in a sort of spiral. To use it. drill a hole a little larger than the central core, and hammer the plug in. The fins compress, then force themselves against the sides of the hole to hold the plug even if the masonry does give way.
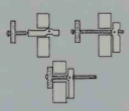
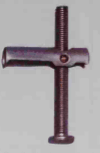
Rawlbolts
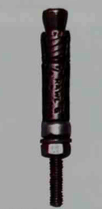
The thing to use if you need a really heavy-duty grip — for example, fastening a lean-to roof to the side of a house. Rawlbolts work in much the same way as a standard plug, but are made from metal, and come ready-fitted with a bolt. Various sizes are available, and you can choose between a number of types of head, including a threaded stud to take a nut, a hook, an eye, and a normal hexagonal bolt head.
Wooden pegging
The solution to the problem of fixing into mortar joints — take a piece of wood, preferably hardwood, roughly 19mm (3/4in) in diameter, taper one end, and then drive it into a 12mm (1/2in) hole with a mallet. You can then screw into it in the same way as any other piece of wood.
Masonry nails
Masonry nails are used like any other nail. They are just specially hardened, and designed to penetrate and hold in masonry. They come in sizes to suit most jobs — choose a length that will penetrate the wall by about 19mm (3/4in) — and, in spite of their tendency to shatter if you don’t hit them squarely, they do offer a fast way to get a grip. However, the result is not neat, so reserve them for rough constructional jobs, where looks are not important.
Plugging compound
For a relatively light fixing in crumpling walls, use a plugging compound; a fibrous material that you mix with water and pack into the hole using the tool provided. Once the hole is full, make a starting hole with the pointed end of the tool, and carefully drive in the screw As the compound dries, it “cements” the screw in place.
Fastening to hollow walls
Here, getting the screw to grip is even more of a problem than with a solid wall. After all, the screw has nothing to bite on but air. There are a number of ingenious solutions, but virtually all have a snag; remove the screw, and the fixing device is lost inside the cavity.
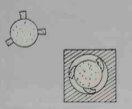
Petal anchors
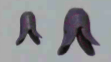
Made from plastic, these are twisted onto the end of the screw and pushed through the hole into the cavity beyond As the screw is tightened, the anchor s petals open out against the back of the plasterboard, or whatever, thus preventing both anchor and screw from pulling out.
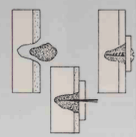
Spring toggles
These use the same principle as gravity toggles The difference is that two sprung metal wings are used to do the bridging job.
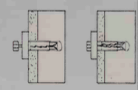
Expanding plugs
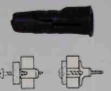
Designs vary, but all work in the same sort of way. You push them into the hole, insert a screw – some have a built-in machine screw – and tighten up. The plug bulges out inside the cavity until it is too large to come pack through the hole.
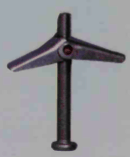
Gravity toggles
The toggle is essentially a small metal hinged device fitted to the end of a machine screw (supplied). When pushed through the hole, it flops down inside the cavity, bridges the hole and so allows the screw to be tightened This bridging action is ideal for lath and plaster walls.
Screwing into the framework
The only way to get a really strong grip in hollow walls is to screw directly into the wall’s internal wooden framework. This consists of upright ‘studs’ spaced about 400mm (16in) apart, and horizontal bars put in mainly where there is a horizontal join between dry wall sheets. The former offer the strongest support for a fastening.
To locate them, tap the wall until it sounds reasonably solid, then drill a series of tiny test holes untii you strike wood. If the studs aren’t where you need them, span two with a stout piece of wood screwed in place on the surface, and fasten into that.
Hints
- When drilling in hard shiny surfaces — ceramic tiles, for example — you often find that the drill bit wanders out of position as soon as you turn on the drill. To avoid this, cover where you want the hole with sticky tape.
- Sticky tape is also handy for making sure you don’t drill too deeply. Just wrap it round the drill bit the length of the plug in from the tip, to form a little flag. When the (lag touches the wall, you know you’ve drilled far enough.
- It’s not just hard surfaces that can make the drill wander off course. It can happen on plaster, too. Here the answer is to make a shallow dent by turning the bit by hand. The dent should then keep the tip of the drill just where you want it.
- Take care when drilling into walls not to go through electric cable. The main danger areas to avoid are above and below light switches or receptacles, and anywhere near wall lights. Also avoid areas near pipes.
- The screw used is important for a strong grip. Choose one that will penetrate at least 25mm (1in); more if it is to carry a lot of weight. The screw gauge also matters. The higher the gauge number, the thicker the screw, and the stronger the grip. A No 6 is for light fastening only. A No 8 will do for most other jobs, but for a very sound grip indeed, use a No 10 or No 12.