Contents
Power Tools List
Although power tools are more expensive than most hand tools, the increased cost is more than outweighed by the speed with which any power tool does the job.
Power tools will handle any job with the same accuracy as hand tools, but they have the extra advantage of speed. A table saw will cut a board in seconds providing a straight, clean cut. And a drill can cut, sand or shape in far less time than the job can be done by hand.
Here is a power tools list with explanations to each tool.
Drills
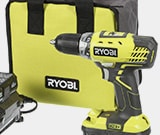
The portable electric drill should be the first power tool in any do-it-yourselfer’s toolbox. The machine is inexpensive and versatile. It can drill wood, stone, metal and plastic; it can cut, sand, shape, grind, mix paint and serve as an electric screwdriver.
Drills commonly come in sizes of 6mm, 9mm, 12mm (1/4 in, 3/8in and 1/2in). The size refers to the maximum shank diameter the chuck will hold. However, that doesn’t mean you’re limited to drilling with bits only as large as your chuck. Oversize bits will have shanks milled down to 6mm (1/4 in) to allow them to be used in homeowners’ drills.
The speed of the drill is usually determined by the size. As size increases, speed decreases. However, the slower speeds provide greater torque to drive oversize bits and hole saws.
Some drill models offer variable speed and some are reversible. A variable speed drill offers you the option of drilling through glass or ceramic at the slow speeds necessary for these materials, while also being able to function as a sander at high speeds. The reverse option means you can back out screws from a hole or alternate the rotation when using sanding or shaping bits.
There are several accessories available to make drilling tasks easier.
For hard-to-reach areas there are flexible shafts, extension bits and right-angle attachments. A flexible shaft is a long flexible tube with a chuck on the end. The tube is attached to the drill and the bit placed in the chuck on the shaft. Extension bits are long enough to allow for hole drilling in areas beyond the reach of a normal drill bit Right-angie attachments allow for right-angle drilling without the awkwardness of working in a confined space.
Stands are available to turn your portable drill into a stationary drill press. The drill fastens quickly into the stand to allow for vertical cutting. There are a variety of stands on the
market, with some made for specific drills only. Check with your drill manufacturer to see if a drill-press stand is available for your model.
Grinding wheels, disks and stones, sanding drums and disks, circle cutters, hole cutters, circular saw blades for metal cutting, paint stirrers and screwdriver attachments are also available to turn your portable drill into a versatile tool in your home workshop.
Routers
The router is an uncomplicated tool that operates at high speeds (around 20,000 to 30,000 rpm) to cut, groove, recess or shape wood.
Although a router is perhaps best known for cutting moldings or fancy edges on workpieces, the machine can also handle dados, stopped dados, grooves, rabbets, dovetails, lap-and-mortise and tenon joints.
Router bits are inserted into the collet chuck at the bottom of the router. The machine is gripped with two hands and moved into the work with the bit in operation.
To insert a bit, unplug the router, grip the lower nut with a wrench to prevent the motor shaft from moving, and loosen or tighten the collet nut with a second wrench. Some machines have a locking device that prevents motor shaft movement, so you’ll need only one wrench to insert a bit.
The bit should move easily through the work with only slight reduction in motor speed. Moving it too slowly can burn the wood and damage the bit, moving it too fast can damage the motor. Too much motor reduction means you’re trying to force the cut.
The bit moves clockwise in the router, so try to keep the router positioned so that the router tends to pull into the wood. This will prevent the router from wavering off course.
Keep bits sharp and buy nothing less than high-speed steel bits. If you plan on using your router frequently, it may be worth investing in carbide-tipped cutters, especially if you’ll be cutting plywood, plastic or laminates which contain abrasives that will dull your cutters quickly.
Work security and safety is important when using a router.
Since initial torque is high when starting the router, it must be gripped firmly in both hands before being turned on. Once in operation, guide the cutter into the top of the work and move it along a path to cut or shape; or guide the router into the work from an edge.
Make sure all work is clamped firmly and the base of the router has enough support. If cutting narrow stock, it would be wise to fasten a block of wood to the base of the router for support.
Routers can also be operated from the underside of a special router table, which can be either purchased or made. The machine is fastened to the underside of the table with the router bit extending through a hole in the table surface. This frees your hands to control the work being cut. Use a fence clamped to the tabletop to guide the work.
Remember to keep fingers clear of router bits, and always wear goggles when operating any equipment.
Circular saws
Although a circular saw won’t replace a table saw or radial-arm saw in terms of accuracy of cut, it does have one advantage over the stationary tools — it’s portable.
The circular saw was originally developed so that sizing of lumber could be done speedily on the construction site. Since then the saw has become popular with do-it-yourselfers where portability is of concern. It can be used in the yard when you’re building a deck or a sandbox. But it car also be used in the shop to make rough cuts in large sheets of plywood or panelling.
The size of the saw is indicated by the diameter of the blade. Since you won’t be cutting through 12mm (1/2in) wood all the time, make sure the blade size of the saw you decide to purchase will, at the least, handle cuts in 5cm (2in) stock at a 45° angle. Blade sizes of 18 or 20cm (7 or 8in) will handle the job.
The blades on a circular saw turn counterclockwise. The top of the blade is covered by a permanent casing, the bottom by a retractable housing that moves up and out of the way as you cut but immediately moves back to cover the blade once the cut is complete.
When cutting, don’t feed the saw into the wood until full speed is obtained. Don’t force the saw, and keep a steady, straight course. Cutting off the line can create a bind in the blade, which will cause kickback.
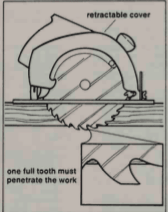
When setting the blade for cutting, make sure that a full tooth of the blade extends beyond the bottom of the work for efficient cutting.
Straight cuts should be made using a guide clamped to the work to keep the saw from veering off course. If you need to cut thick pieces of stock, adjust the blade depth to maximum level, make your cut, flip the stock over and make a matching cut through the other side. Accuracy in marking the cutting line and in saw placement is important in handling this procedure.
Remember to keep your blades clean (by wiping dirt off with turpentine) and sharp so you won’t have to force the saw and damage the motor. Keep the base of the saw lightly waxed for smooth gliding Always wear goggles when cutting.
Portable jigsaw
In addition to making crosscuts or rip cuts in stock up to 5cm (2in) thick, the jigsaw or saber saw is an ideal tool for cutting curves or making pocket cuts for receptacles or light switches. It will cut through wood, metal, glass or tile.
Pocket cuts can be made by piercing a start hole with a drill. Place the blade of the jigsaw through the starter hole and saw according to your layout. The blade cuts with a forward, vertical motion. Angle cuts can be created by using the tilt adjustment on the saw.
The jigsaw’s main feature is its ability to cut curves, but it is also a good tool to use for light-duty cutting in or out of the workshop.
Table saws
If you’ve used a handsaw for a task and then followed that task by using a table saw, you’ll see why table saws have become the most important stationary power tool in any home workshop. The speed and accuracy with which they cut will let you handle any task with greater efficiency.
Blade diameters range from 19 to 25cm (7 1/2 to 10in) with a maximum cutting depth of 3.8 to 8.6cm (1 1/2 to 3 3/8in) respectively. The most common size found in home workshops is the 25cm (10in) table saw. The 20cm (8in) has the added advantages of being slightly more portable and less expensive than the larger vers on, making it easier on the budget for those who don’t plan to Make considerable use of it.
In all types of table saws, the blade is mounted on an arbor which is turned by a motor. The blade projects through a slot in the top of the table, and is adjustable to create different depths of cut. All machines come equipped with mitre gauges for cross or mitre cutting and laterally adjustable rip fences.
The blade rotates toward you as you stand in front of the saw, and the work is fed into the blade from the front of the table.
The blade is covered with a pivoted blade guard, which should be kept in position at all times as a safety precaution. There are some cuts, however, such as dados, grooves or shaping, that can’t be made with the guard in position. Know this when you’re making these cuts and Keep your mind focused on your cutting activity. Remember, these machines can hurt.
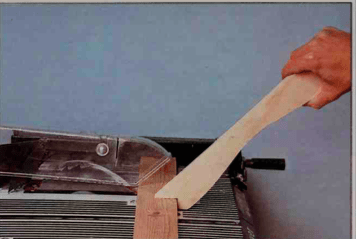
Keep fingers at least 15cm (6in) away from the blade To move narrow stock past the blade, use a push stick instead of your fingers.
Table saws are capable of producing smooth, accurate and straight cuts. But these saws are only as good as their users, so learn how to make the fullest use of them. And make sure you measure and mark accurately without relying on the calibrations on the tool. Tool calibrations are not always perfect, and measuring accurately with a protractor can mean the difference between a perfect mitre or one that gaps.
Sanders
You can make fast work of sanding with two of the most common power sanders found in home workshops — the belt sander and the pad sander.
The belt sander is the workhorse, removing old finishes, taking down stock, polishing metal and re-edging some of your garden tools. The wide selection of abrasives and grits means a number of rough sanding tasks can be handled quickly by this tool.
The belt sander uses a continuous belt of coated abrasive that runs over two drums, one located at each end of the machine. The motor oowers the rear drum and the front drum adjusts tension and tracking. The most common belt sizes are 7.5 or 10cm (3 or 4in) width, with a length of about 60cm (24in).
A coarse grit belt moving at high speeds will remove stock the fastest if that’s your aim. Finer grits and slower speeds allow for smoother work.
Since the belt sander removes a considerable amount of material, the inevitable sanding dust can float and land anywhere. Check out the sanders that come with built-in dust-collecting systems or attachments to allow the use of your home vacuum cleaner while sanding. You’ll keep the air free of dust and your workshop cleaner.
To operate the belt sander, start the motor, then lower the tool to the work. Always keep the sander in motion or you’ll create depressions in your work.
Move the sander back and forth, working in the direction of the grain. Cross-grain sanding will raise considerable nap on the wood, which creates a rougher surface.
Light-weight material should be clamped when sanding, since the tool has enough force to cause kickback.
Remember to watch the edges of wood when sanding. Keep the base of the sander firmly on the wood so that the edges don’t become rounded.
The pad sander, which has a straight-line sanding action, or the orbital sander, which cuts in circular movements, are considered to be finishing sanders. They don’t remove stock; they smooth it to create a scratch-free surface either in varnish and lacquer or on wood.
The sanders come with a soft flat pad wrapped with a rectangle of sandpaper. The abrasive material is pulled taut over the pad and clamped tight at both ends of the sander.
A front knob is a feature on most machines and it permits two-hand operation. However, two-hand operation is meant only for guiding the machine, not for extra pressure. In most instances, the abrasive will cut the surface simply by the weight of the tool. A heavier pressure is likely to inflict deep scratches in the stock.
Watch your sandpaper and as the grit becomes clogged, replace it. Clogged paper won’t abrade stock and you’ll end up wasting a lot of time and effort.
USING POWER SAWS

When using a circular saw, adjust the blade to ensure that one full tooth will penetrate the work to ensure maximum efficiency in cutting.

When using a table saw, make sure your fingers are always at least 15cm (6in) away from the blade. Use a push stick to move thin stock past the blade.
