Contents
Need to Fix a Floor? Squeaky & Sagging Floors
Squeaks, sags and splits are part of any homeowner’s vocabulary when it comes to keeping floors in top condition.
Most homeowners have experience with squeaky floors. The pattern of noises that follows you as you walk across a floor usually means some loose floor boards. Repairing squeaks in either the finished flooring or subfloor is a fairly simple procedure, but a sagging floor is a major problem that should be dealt with immediately.
Sagging floors
Floor-sagging is a result of weakened joists and posts. This weakness has a number of causes, including improper original construction, house-settling which shrinks or warps the joists, heavy loads on a floor not built to handle them, rotting wood, or house additions that put stress on the existing floor.
If left unrepaired, a sagging floor can cause major structural damage to a house. Sagging floors will show up in windows that won’t open no matter how hard you try or what method you use, doors that jam tightly, cracking plaster and sloping floors that have lost their feeling of solidity.
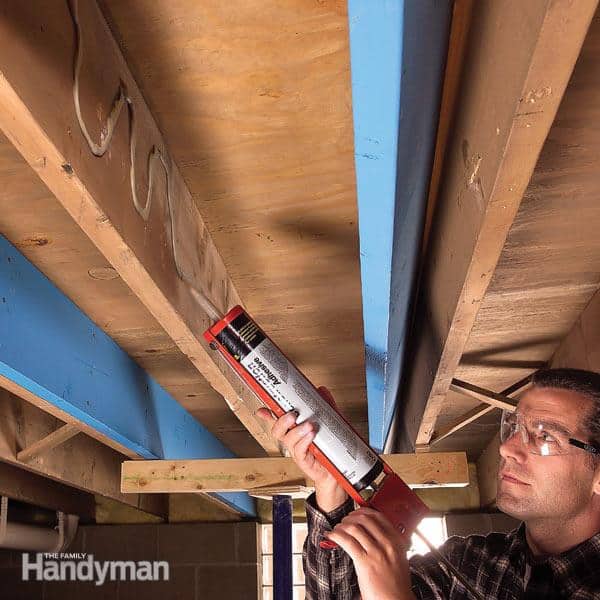
To correct a sag, install jackposts in the basement. These posts are made from two telescoping steel tubes with an adjustable steel-pin locking mechanism.
To use the jack, place a large wooden beam or concrete footing on the concrete floor and position the jack base plate on it. Position another beam under the joists and slide the top plate of the jack into position under the top beam. Turn the jack handle slowly until you feel slight resistance. At this point you must stop the jacking and wait 24 hours before any more pressure is applied. Any further lifting of the steel jack could cause serious structural damage to the house — joists and studs could crack and wall plaster could fall. After at least twenty-four hours, turn the jack handle no more than 6mm (1/4in). Wait a week before turning another 6mm (1/4in). The process should be done slowly over a number of weeks to prevent structural damage. Keep checking the level of the floor to determine when the sag has been corrected.
Squeaky floors
A floor is actually two layers thick. The top layer (the finished flooring) is either wood or a surface covering such as linoleum, and the subfloor is usually plywood sheathing.
When a floor squeaks, it usually means loose boards in either the finishing or subflooring.
If the joists under the floor are exposed, the damage can usually be repaired from underneath. Locate the source of the squeak and drive a wedge between the subfloor and the top of the joist to support the loose boards. Or you can nail a 2 x 4 to the side of the joist, with the top edge of the 2×4 forced tight against the bottom of the subfloor to take up the slack.
If joist movement is causing the squeak, toenail some diagonal bridging between the joists to stop the movement.
If the squeak is between joists, diagonal bridging may be helpful, or you can Install pieces of 2 x 8 at right angles between the joists, forcing the top eage of the 2 x 8 tight against the subfloor.
Loose or warped boards on finished flooring can be repaired by drilling clearance holes into the finished floor and driving flooring nails through the board into the subfloor. When possible, nail into a joist.
Squeaks in floors where there are no exposed joists must be handled from above. Locate the squeak, and drive flooring nails through the floor and into a joist. To find the joist, hammer-tap a block of wood over the floor until you hear a solid tapping sound rather than a hollow one The solid sound will mean you’ve found the joist. Countersink the nails on a wood-finished floor and fill with a matching wood putty.
Repairing floorboards
To replace split or worn floorboards, drill holes across the width of the damaged board to provide an opening for grasping the board for removal. Make sure you don’t drill into the subfloor. Use a stop block on your drill bit to ensure the holes go through just the finished flooring. Chisel-cut the tongue of the damaged board and then remove the board
Cut a new piece to fit exactly and chisel off the bottom half of the groove side so the board will fit over the tongue of the adjoining floorboard. Coat the board with glue ana put it in position, tongue side first. Hammer into place with a mallet and wood block. Drill clearance holes. Drive and countersink flooring nails, then cover the nail holes with wood filler.
Refinishing a hardwood floor
Remove the shoe molding from the baseboard. Working with the grain, sand the floor with a drum sander until bare wood is exposed. Use a coarse sandpaper for the rough sanding.
Then use a finer grade of sandpaper and resand the entire floor to remove scratches. Overlap sanding areas to prevent visible lines.
If you plan to stain the floor another color, apply two coats of a penetrating stain and then finish with a durable, scuff-resistant clear finish. Apply two coats of the finish for full protection.
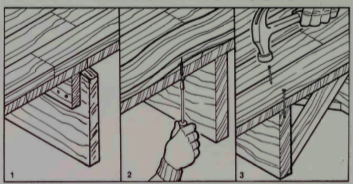
How to correct squaking floors step-by-step
There are several methods of correcting squeaking floors. You can add hardwood strips at the join of the joist and subfloor (1). You can screw from the bottom into the floor (2). You can drive nails dovetail fashion through the finish floor into the joist below, countersinking and filling the nail holes, or you can ado additional bridging for rigidity (3).
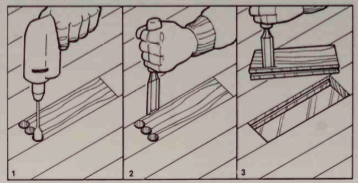
How to repair floor planks step-by-step
To repair a wood floor plank, first drill holes in the center of the board (1). Chisel out the tongue of the board (2), remove it from the floor and trim opening edges. Cut a new board to fit and chisel off the lower half of its groove (3), so that it will fit over the adjoining tongue. Glue and tap into place. Sink nails at ends.