
Contents
Sink Leaking from Drain – How to Fix It
Get rid of the drip-catching bucket—without paying a plumber
Under-sink drainpipes are the most common source of plumbing leaks. And a permanent drip bucket is the most common solution. But you don’t have to live with a drip. You can end it yourself, even if you have no plumbing know-how. The solutions for a leak under a bathroom sink are similar to the kitchen-sink fixes shown here.
Be a drip detective
Before you can stop a leak, you have to find the source. And that can be tricky. Water that escapes a pipe might run horizontally for inches (or even feet) before it drops onto the cabinet floor. So do this: Get under the sink with a flashlight and look for stains or mineral deposits that reveal the trail of leaking water. Pay special attention to the joints where sections of pipe meet; that’s where most leaks occur.
If you don’t see any “water tracks,” wipe down the pipes with a rag. Fill both bowls of the sink with warm water (cold water can cause condensation droplets to form on the pipes, making it impossible to find leaks). Let the sink drain while you examine the pipes below. Be patient. The telltale leak droplets may take a few minutes to show up.
Fixes for leaky joints
When you’ve found the leak location, try the simplest fix first: Just tighten the nut. You can usually turn plastic nuts by hand, but metal nuts require pliers. Either way, hold on to nearby pipes so you don’t misalign other joints while you work (with metal pipes, that means having two pliers). Here are two more fixes to try:
Straighten crooked joints
Joints often leak because they were knocked out of alignment by the trash can. To straighten a crooked joint, just loosen the nut, realign the pipe and retighten.
Disassemble and replace parts
Most joints contain rubber or plastic washers that can be replaced (see next page). Take the old parts to the store to find a match. You may have to disassemble two or more joints to get at a bad washer.
Replace the whole works (no plumbing experience required!)
The fixes shown there often work. But sometimes they don’t. And sometimes—especially with old metal pipes—they’re just a temporary cure. So plumbers often skip the little fixes and replace the whole drain assembly. That’s not as difficult as it sounds, and for $25 or less you can have a whole new drain line. Kits sold at home centers contain most of the essential parts. But snap a photo of your system and take it to the store to make sure you get everything you need. Here are some possible extra parts you may need:
- Long tailpieces. The tailpieces that come with kits are often only a couple of inches long.
- A trap arm extender. The arm that comes with the kit may not reach the drainpipe that protrudes from the wall.
- A dishwasher wye that has a connection for your dishwasher hose.
- A disposer kit that allows the waste arm to connect to a garbage disposer.
Here are some pointers for a smooth project:
- You’ll have to cut a few pipes: both tailpieces, the waste arm and maybe the trap arm. A fine-tooth hacksaw works best.
- When in doubt, mark and cut pipes a bit long. Better to cut twice than cut too short and make an extra trip to the hardware store.
- Don’t forget to insert tailpiece washers (Photo 1). Other joints require cone washers. The only joint without a washer is the ground joint at the trap.
- Assemble everything loosely until the whole assembly is complete. Then tighten all the slip nuts.
- Hand-tighten the slip nuts. If any joints leak when you test the new assembly, tighten them slightly with pliers.
- When you’re all done, test the assembly for leaks.
1. Start with the tailpiece
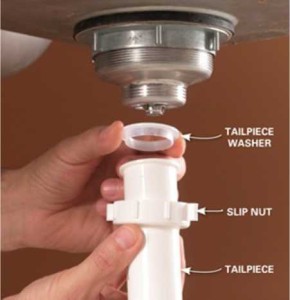
Attach the tailpiece to the basket strainer, but don’t fully tighten it yet; you’ll have to remove and cut it later.
2. Connect to the drain system
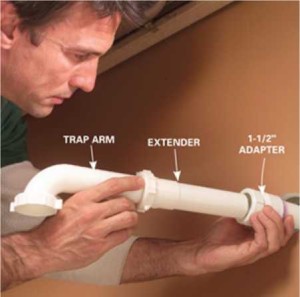
Slide the trap arm into the adapter where the sink drain connects to the drain pipe inside the wall. Then attach the trap and slide the arm in or out to position the trap directly under the tailpiece. You may need to cut the arm or add an extender.
3. Install the tee
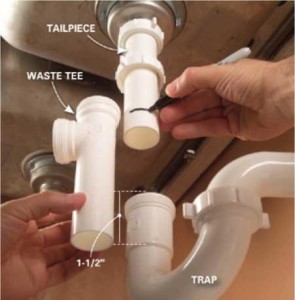
Hold the waste tee alongside the tailpiece about 1-1/2 in. below the top of the trap. Mark the tailpiece 1/2 in. below the top of the tee. Cut both tailpieces to the same length and install them.
4. Install the waste arm
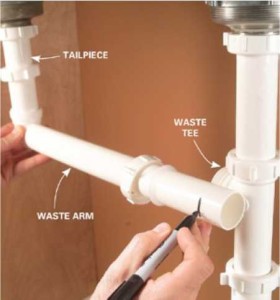
Slip the waste arm onto the second tailpiece, make it extend about 3/4 in. into the tee and mark it. Cut and install it.
5. Slope the waste arm
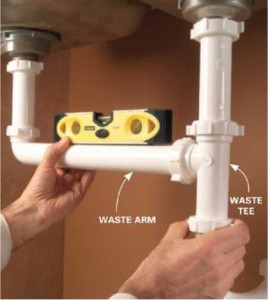
Loosen the slip nuts and slide the tee up or down so the waste arm slopes slightly down toward the tee. Tighten all the nuts.
TIP: Brush a little Teflon pipe thread sealant on threads. It lubricates the threads and makes slip nuts much easier to tighten. Check the label to make sure the sealant is safe for plastic.