
Fence Post Repair – Wood Fences Restoration
Wood fences require little maintenance beyond regular painting and staining. But if you’ve noticed decay on a part of your fence, repair it now before it weakens the structure.
Wood fences will start to decay after a number of years. The major area for rot attack is the fence post, since it sits in the ground and comes into contact with insects and moist earth.
A properly set post will last several years, but should you notice rot and decay of the wood, the post should be replaced or repaired before it causes further damage to the fence.
To set a post, use a post-hole digger to make the hole. The post should have one-third of its length buried underground, but for better support and to prevent heaving, bury the post below the frost line.
Wood that comes into contact with the ground must be treated to reduce decay It is advisable not to use creosote or pentachlorophenol to treat the wood yourself. Controversy surrounds the harmful health effects of these two preservatives. There are wood preservatives on the market that contain neither creosote nor penta. You can also use commercially available pressure-treated wood for your posts. This wood is chemically treated in factories following government regulations, and some manufacturers claim their product will last 60 years. Try to buy pressure-treated wood to the length and width you need. Any cuts made in the wood must be chemically treated to prevent decay.
Wear gloves and goggles when applying the chemical and avoid breathing the fumes. It’s also advisable to protect yourself when cutting commercially treated wood. Wear a respirator to avoid breathing sawdust.
Place a flat rock or some gravel in the bottom of the hole for drainage. Set the post in the hole and hold it in place with braces. Make sure it’s plumb. Mix up some concrete and fill the hole with it. A hole that is slightly wider at the bottom than it is at the too will be stronger support for the post once it’s filled with concrete. Make sure the concrete rises above ground level; tap it well to remove air bubbles, then slope it up toward the post at a 45° angle to allow for water runoff.
Once the concrete has hardened, any caps between the post and the concrete should be patched with asphalt cement to prevent seepage.
If the decay is in only one section of the post, it may not be necessary to replace the entire post. Cut the decayed area out. When the decay is below ground level, drive two long pressure-treated boards into the ground on either side of the post and fasten the boards to the post using galvanized nails or screws. Make sure the bottom of the post is several inches above ground level to help prevent further decay.
When the top of the post is decayed, replace it with a new piece of lumber and fasten it to the bottom piece using a half-lap joint. Although the above repairs are possible, it’s best to replace a fence post completely once it’s rotted. Dig out the old concrete and the post and follow the instructions for setting a new post.
In most cases, it’s possible to replace a fence rail without moving the posts. First, remove the pickets. If your rail is fitted into post sockets, remove all the nails and saw the rail as close as possible to the post. Replace with a new rail fastened with an angle iron against the post. Make sure the ends of the new rail have been treated with a pressure-treated wood sealer. Use galvanized nails or screws to fasten the bracket.
Rotted rails that are fastened with angle irons can be replaced by simply removing the angle bracket, cutting a new rail to fit and replacing the rail and angle iron.
To ensure a tight bond between rail and post, you can caulk around the rail with a weather-resistant caulking to prevent moisture from seeping in
To replace pickets, remove the decayed board. Use the old board as a cutting pattern for the new piece Seal the ends of the new Dicket and attach to the bottom and top rails of the fence using galvanized nails.
SETTING A FENCE POST
Use a post-hole digger to make the hole. Add some gravel to the bottom of the hole then set the post in place.
Hold with braces and check for level.
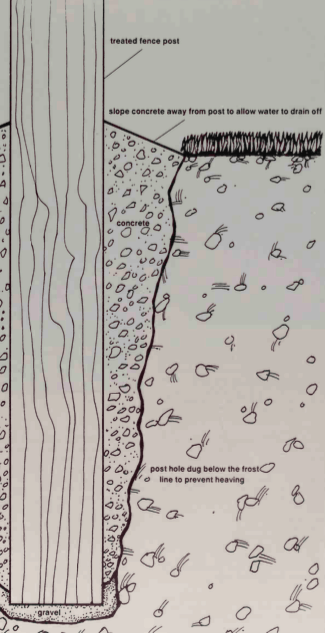
Pour concrete into the hole to secure the post. To prevent heaving of posts, holes should be dug below the frost line. Support wobbly posts temporarily with wedges.