Contents
- 1 Resurfacing Kitchen Cabinets: How to Improve Kitchen
- 2 Adjust misaligned doors
- 3 Tighten loose knobs—forever
- 4 Beef up drawer bottoms
- 5 Lube stubborn drawers
- 6 Fix stripped screw holes
- 7 Hide damage with back plates
- 8 Ingenious (and easy) kitchen improvements
- 9 Stop sprayer snags
- 10 Wine glass molding
- 11 Bottomless soap dispenser
- 12 Under-sink makeover
- 13 Replace missing bumpers
- 14 Better than bumpers
Resurfacing Kitchen Cabinets: How to Improve Kitchen
Most problems are easier to fix than to live with
As your cabinets age, you can just give up and learn to live with all their little glitches. But there’s really no reason to tolerate cabinet problems. The most common frustrations are amazingly easy to eliminate, even if you have no fix-it experience.
Adjust misaligned doors

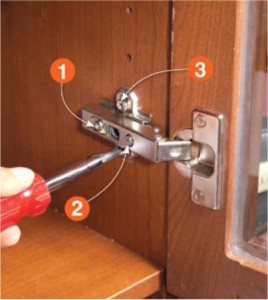
If your doors are out of whack and you have “Euro” hinges, you can align them perfectly in minutes—just by turning a few screws. Your hinges may not adjust exactly like the ones shown here, but it will be just as easy and you can’t do any harm by turning the wrong screw. To start, make sure the door screws are tight. Then follow this simple process:
- If the door isn’t flush with neighboring doors, use this screw to move it in or out. With some hinges, the door moves as you turn the screw. With others, you have to loosen the screw, nudge the door in or out, then retighten.
- If the door is crooked—not parallel to other doors or the cabinet—turn this screw to move the door left or right.
- If the door is flush and parallel, but standing too high or low, loosen this screw and the identical one below it. Raise or lower the door, then retighten the screws. Some hinges allow the same up-down movement just by turning a single screw.
Tighten loose knobs—forever

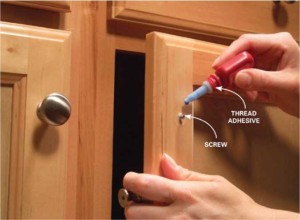
If you have a knob or handle that keeps coming loose, give it a tiny dose of thread adhesive (available at home centers). Some thread adhesives make future screw removal almost impossible, so choose one that allows for disassembly.
Beef up drawer bottoms

When drawer bottoms start to sag like a hammock, add a layer of 1/4-in.-thick plywood to the underside. Cut the plywood about 1/2 in. smaller than the cavity under the drawer. (Some home centers will cut plywood to size for you.) If the drawer bottom is unfinished, mount the new plywood with wood glue. If the bottom is coated, use construction adhesive. Weigh down the plywood with paint cans or a stack of books.
Lube stubborn drawers

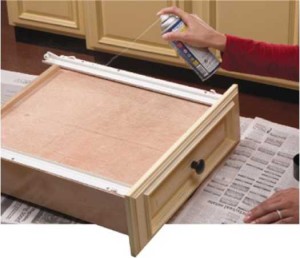
To make a sticking drawer glide, coat the slides and rollers with “dry” lubricant. It goes on wet, but dries without leaving oily residue, so dust and debris won’t gum up the slides later. Dust off the slides in the cabinet and on the drawer first. To avoid a mess inside the cabinet, spray the lubricant on a rag and wipe it onto the slides. You can treat the drawer parts the same or spray them.
Fix stripped screw holes
Cabinet hardware screws often strip. You turn and turn, but the screw doesn’t tighten. But the solution is already on your cabinet shelf: Grab a few toothpicks, dip them in wood glue and pack them into the hole. When the glue dries, break off the toothpicks and drive in the screw.
Hide damage with back plates
New cabinet hardware that includes back plates can hide the wear that occurs around cabinet knobs and pulls. You’ll find a small hardware selection at home centers and an endless selection online.
Ingenious (and easy) kitchen improvements
Stop sprayer snags
If the hose connected to your sink sprayer gets caught on the shutoff handles, cover them with 1/2-in. pipe insulation. If the insulation won’t stay put, add some duct tape.
Wine glass molding
T-molding designed for wood floor transitions makes a perfect rack for stemware. Just cut it to length and screw it to the underside of shelves. For a neater look, use finish washers along with the screws.
Bottomless soap dispenser
Constantly refilling your sink-mounted soap squirter? Yank out the dispenser and take it to a home center to find tubing that fits over the suction tube. Run the tubing into a large jug of soap and you’ll have a long-lasting reservoir.
Under-sink makeover
The cabinet under the sink gets pretty grungy. So cover the stains with cheap peel-and-stick vinyl tiles. They’re easy to cut with a utility knife, easy to install and easy to keep clean.
Replace missing bumpers
Your cabinets came with felt or rubber bumpers, but a few of them have disappeared and you’re accustomed to the smack of closing doors. Give your ears a break for about $3. Peel off a bumper and take it to the home center. Your new bumpers don’t have to match the old ones, but they should be about the same thickness.
Better than bumpers
Cabinet door dampers are the ultimate slam solution. They install with a just a screw or two and provide soft closings. They work only with self-closing hinges that hold the door shut, but that covers the majority of cabinet hinges. Find dampers at home centers or online.
