Measuring Tools and Marking Tools
The difference between a professional- and amateur-looking job can be in the measuring. For pieces to fit perfectly, accurate measurements are essential. An eighth of an inch can throw off the whole balance of a job.
No matter what tool you use to measure, take your time and follow the adage, “Measure twice, cut once.”
The steel tape measure is the most common measuring tool used by do-it-yourselfers. It offers the flexibility of making inside and outside measurements as well as measuring round objects.
The folding wooden rule is used in place of the flexible steel rule when rigidity is of concern. If you need to measure across wide openings, then it’s preferable to use the wooden rule.
To ensure accurate markmg when using the steel or wooden rule, mark your cut points with a V. The point of the V is the exact measurement from which you draw your cut line, using a square or T-bevel.
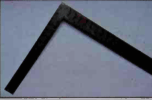
The try square is used to test for squareness in adjoining surfaces and is also used for right-angle marking.
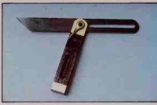
The combination square tests for squareness, can be used for right-angle marking or mitre marking
The framing square is a large carpenter’s marking tool.
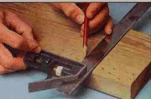
The T-bevel is used to duplicate an angle cut from one object to another.
Levels, which are used for checking vertical and horizontal surfaces, are available in a range of sizes from the smallest, the Iine level, which is suspended on a string for long span levelling, to the mason’s level, which is 1.2m (4ft) long. The most practical level for home use is a 60cm (2ft) long carpenter’s level, which provides level, plumb and 45° tubes that check horizontals, verticals and angles respectively.
For accurate marking, Make sure one end of the board you’re cutting is square. To do this, hold the body of a combination or try square firmly against a machined edge of the board. The blade of the square then lays flat across the width of the board to show the true 90 edge. Scribe or draw a line along the blade of the square and cut the board at this line. Use the new cut edge to measure your length, mark the cut line with a V, then, holding the body of the square firmly against the side of the board, draw or scribe your measured line. Remember to cut on the waste side of the line for accurate fittings. If you don’t plan on cutting the board right away, mark the waste side of the wood with an X so you’ll know where to cut when you come back to it.
If you need to mark for a lengthwise cut on a board, a marking gauge can be used. These tools have an adjustable ruled gauge which is locked in place for marking. The body of the gauge is held firmly to the side of the board and drawn down the length of the wood. A scriber on the tip of the ruled gauge then scratches a line in the wood parallel to the side of the board A chalk line can aiso be used for lengthwise marking.
For marking small cycles, use metal dividers For large circles, trammel points can be used with a wood strip Simply hammer one metal trammel through the strip to indicate the center of the circle. The second trammel is hammered through the strip at a distance equal to the radius of your circle. The center trammel point is held firmly against the wood while the circle is scoped using the trammel at the end of the wood strip.
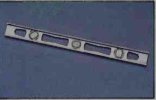
1 Levels are used for checking vertical and horizontal surfaces and are available in a range of sizes from the tiny line level to the 1.2m (4ft) mason’s level.
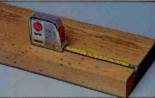
2 The steel tape is the most common measuring tool. Its flexibility allows the do-it-yourselfer to make inside and outside measurements.
3 The framing square (also called the rafter square) is a large carpenter’s measuring tool that is used for marking rafter cuts.
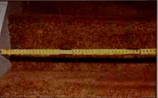
4 The folding wooden rule is preferable to the flexible steel tape when rigidity is of concern. Use it to measure across wide openings such as stairways.
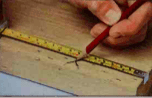
5 To aid in making an accurate cut line, mark your cut points with a V. The point of the V is the exact measurement from which you draw your cut line.
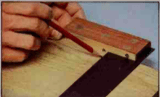
6 The try square is used for right angle marking and for testing the squareness of adjoining surfaces to ensure a tight fit when joined.
7 The combination square is also used for right-angle marking and for testing squareness in adjoining surfaces, but it can also be used for mitre marking.
8 Use a T bevel to duplicate an angle cut from one object to another. Line up the bevel with the angle. Tighten the wing nut and transfer the angle.