
Building a Deck
A well-planned deck is simply an outdoor addition to your home and should provide both privacy and convenience.
A deck is a part of the house and must be as comfortable as any other room in your home. Although the deck is built for outdoor living, you want it to afford some privacy so you can either relax undisturbed or have a private outdoor spot for entertaining.
The first step in building a deck is the planning. Although this may seem obvious, there are several factors other than the structural techniques that need to be considered before you start to saw and hammer.
The location of the deck should be your first consideration. Will it be used as an extension of your living room for outdoor entertaining, or do you plan to use the deck as an eating area where it would be best located off the dining room or kitchen? Do you want to create an outdoor sitting room off the master bedroom, or will the deck be used for a play area and for sunbathing?
Your second consideration should be the solar orientation of the deck. You may want to use the deck for entertaining, but if it’s a sunny spot your guests may find the heat unbearable. Conversely, if you want to use the deck for sunbathing, a shady location is less than ideal. In the summer, a deck on the west side of your house will gather the most sun. A southern exposure for your deck also means a warm spot but is the ideal location for an enclosed deck you can use all year round. Even in the winter, although the sun is low, it still shines from the south, allowing you to pick up some of the sun’s warm winter rays through a glassed-in deck enclosure. A deck on the north side of your house will rarely receive warm sunlight, and a deck on the east will only receive the cooler morning sun.
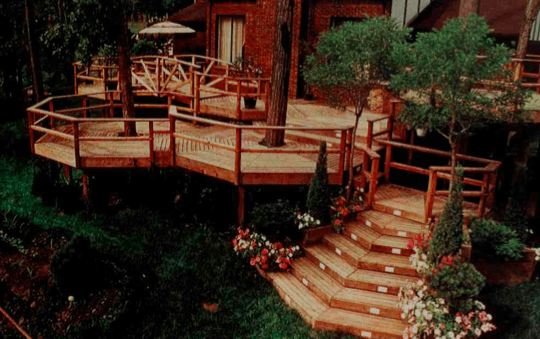
The ideal situation for a deck then is to site it around your house on the north and west side or the east and south sides. This L-shaped deck will provide both sunny and shady spots to handle almost all your deck requirements. If your building code doesn’t permit an L-shaped deck, or if you simply want a deck on one side of your house, you’ll have to decide on the major use of your deck before you can determine its solar orientation.
Wind will also affect your comfort on the deck. Try to choose a location that is sheltered from wind. If you can’t find a sheltered area, build a windscreen next to your deck, using trees or latticework fencing.
The size of your deck is an important consideration. Too small a deck won’t give you the necessary room to handle large outdoor furniture, and too large a deck may be out of scale with your house and property To get a feel for the size of deck you need, arrange your patio furniture in the spot you’ve chosen for the deck. Is there enough room to allow for both the furniture and for traffic patterns around the furniture?
A second way of determining the size of your deck is to draw the deck to scale. Start with some lined graph paper and use a scale of 25mm (1/2in) to 7.5cm (1ft). Draw the boundaries of your lot and add the outline of your house Put in any trees, shrubs, gardens and walkways. Mark the location of doors ana windows on your house outline
Once everything is in place in the drawing, cut a piece of cardboard (to scale) the size you’d like your deck to be. Move this cardboard around the perimeter of the house outline on your drawing to find a suitable location. Remember that a door from the interior of the house to the deck is ideal, so you’ll have to place your deck where there is an existing door or be prepared to install a new door in the location.
Once you have found a location, cut out cardboard to scale to represent your current outdoor furniture and possible future purchases. Place them on the deck to see if it will be iarge enough to accommodate everything that will be required of it. Built-in seating can be handled around the perimeter of the deck without wasting a iot of floor space.
Now is the time to consider the options for your deck. If you build your deck around trees or other plantings, you can give the appearance of a larger deck without the need of building one. You may also want to consider
a multilevel deck with separate areas for eating and relaxing. Building in a barbecue or a sandbox are other options. The choice is up to you, and you should decide based on your needs and the size of the deck that can be accommodated on your lot.
Once you’ve arranged all the pieces on your drawing, you can then set up the actual boundaries of your deck to get a feel for the actual size Pound a wood stake into the ground at the proposed four corners of your deck. Link the stakes with some heavy string and you’ll have the perimeter. Make any adjustments to the size that you feel are necessary ana transfer these changes to your drawing.
The final step in planning is to determine the look of your deck — multilevel, single level, on grade, raised, steps if necessary, built-in seating, planters, boards laid flat or on end, sides on the deck or not and the appearance these sides will take, and type and amount of wood. Check your neighbors decks for ideas or search through books at the library. Some lumber compan.es offer special deck design services or will provide pamphlets with decking ideas You car pul! ideas from various deck designs to suit your purposes and have your lumber supplier help you with the quantities of wood you’ll need.
Before starting construction, visit your local building permit department to see if a building permit is necessary. If it is, you’ll have to present your plans to ensure that they’re ‘up to code’, and your construction will require inspection along the way.
When planning your deck, consider the options. You can build a deck around a tree or you can have a multi-
level deck with separate areas for dining and relaxing. Decide on your needs – do you want privacy; large
areas for entertaining; or a small, private outdoor room in which you can relax?
Building the deck
Although you car build decks from other material, wood is most commonly used. The wood you buy must be rot-resistant and impervious to termites and other insects. The most common choices for decking material are redwood, cedar and pressure-treated wood, although you may find cedar and redwood hard to come by and certainly more expensive than the pretreated wood. Should you use redwood or cedar on your deck, they can be left unstained to age naturally. Pressure-treated wood usually has a green cast and, unless you like the green look of the wood, it would be best to stain the deck with a waterproof semitransparent stain. The water-repellent stain offers a bit more protection against the weather.
Wood is sized in nominal measurements that are slightly larger than the actual measurements. For example, a 2 x 4 is actually 1 1/2 by 3 1/2. Be aware of these sizing differences when purchasing your wood so that you’ll buy enough to handle your deck measurements. Use a construction-grade lumber for your deck. Anything less will be inadequate to handle the loads a deck must carry.
When buying your wood at the lumberyard, insist on selecting your own lumber. The wood you select should be free from defects such as knots, warps, cups or checking. You want straight, sturdy wood, and if you leave the choice of wood up to the lumberyard, there’s no guarantee you’ll get the best wood for your purposes.
Wood has a maximum stress point. This point is the weight the wood can bear without cracking. You’ll need to know this weight-bearing load before you can determine the size of wood you need to buy and the post and beam structural configuration you’ll need to support the deck. You won’t need a course in engineering, however. Most local building departments will supply structural tables to make your decision easier.
We’ll start our deck construction techniques with an on-grade deck. This is the easiest type of deck to build, because it doesn’t require the digging of post holes or the pouring of concrete.
Your first step is to outline the area of your deck by driving stakes into the ground at the corners of the deck. Join the stakes with some heavy string. Make sure your outline is square and true. Use a framing square for checking or use the following mathematical calculation. Measure exactly 91cm (3ft) from the corner along one of the strings and mark the spot. Measure exactly 121cm (4ft) from the corner along the second string and mark. Measure the distance between the two marks. If the distance is exactly 152cm (5ft), your corner is square.
Dig out the earth within your outline to a depth of 10 or 12cm (4 or 5in) to provide a drainage layer. Tamp the soil firm. Add a 5cm (2in) layer of gravel for drainage and rake the gravel level. On top of the gravel add a 5 or 7.5cm (2 or 3in) layer of sand and rake level.
You’ll want to control weed growth under your deck, and this can be done at this stage following one of two methods. The first is to apply a chemical weed-killer to the area within your outline. The second method, and one that will ensure you won’t destroy the lawn surrounding the deck with a chemical, is to apply a layer of polyethylene over the sand to fill the entire outline of your deck area. You’ll need to perforate the plastic to allow for drainage and to prevent runoff. You can build your on-grade deck directly over this plastic or add another layer of gravel and sand, again making sure the surface is level.
An on-grade deck can be placed directly on top of this ground surface. Start the deck by installing 1 x 8s on edge around the perimeter of the deck. Make sure the board extends above grade even with the top surface of your planking. Ensure that the boards are square and true, then backfill the outside area to provide support.
On-grade decks without footings are usually made in 29m2 (3ft2) modular units, which can rest directly on the ground. In cold climates where the ground shifts, modular units can move without a complete break-up of the decking.
To build a modular unit, construct a jig of four pieces of lumber, making sure the corners are square. Lay two pieces of 2 x 4 on opposite sides of the jig for runners, the base to which you’ll nail your planking. Cut enough 2×4 planking to cover the runners either laid flat or on edge. Leave at least 60mm (1/4in) between the planks for drainage and to allow for the expansion and contraction of wood. Nail the planks to the runners and you have your first module. Continue building modules in this manner until you have enough to fill your deck area.
Once all the units have been constructed, start laying them in place from one corner of the deck area. For a more attractive appearance, lay the modules with planking at right angles to each other. Make sure each unit is flat and level before proceeding to the next. Each unit should be butted firmly to the adjacent units.
Fill the area below the planks and between the runners with sand for additional support.
If the door leading from the house to your deck is above the ground, you can install steps down to your on-grade deck or you can build a raised deck so that the deck floor sits flush with the door threshold, giving it the appearance of an extension of your house.
Raised decks are more difficult to build than on-grade decks. This is where the structural rules come into play.
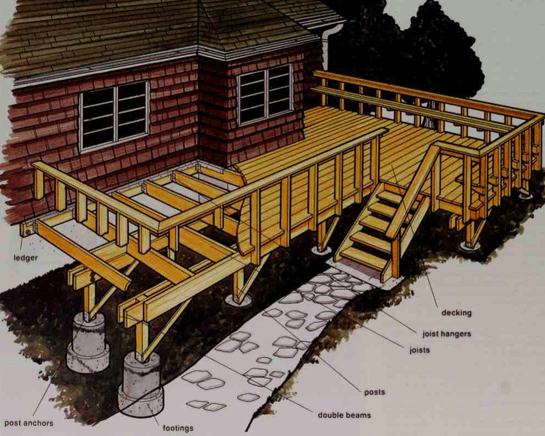
The deck is made up of 2 x 4 or 2 x 6 planking nailed at right angles to 2 x 8 joists. The joists are secured at right angles across 2×12 beams, 2×8 braces can be nailed between the joists for support. One beam is bolted to each side of a 4 x 4 post, which is anchored in a concrete footing sitting below the frost line. The number of posts and beams needed will usually be dictated by building code specifications.
The raised deck is usually fastened to the house on one side by means of a 2 x 8 ledger rather than post and beam construction. The ledger is fastened into the studs of the house by means of lag screws or expansion bolts.
To build a raised deck, start by forming the outline of the deck with batter boards. Make sure the corner of the batter board is square, then attach string to the batter board so that the corner of the deck will be where the two strings intersect. Check for squareness, then drive a short stake into the ground at the corner. This will be where you dig your first post hole to accommodate the concrete footing, pillar and post. Mark the locations for the required number of posts along the strings.
You’ll need to dig your holes deep enough to satisfy your building code requirements for footings. Remember that the holes need to be dug below the frost line. A firm base of earth is also required for the footings. Dig to tight, firm soil or tamp your soil to ensure solidity.
Footings are poured concrete 15 to 20cm (6 to 8in) thick and 30 to 60cm (1 to 2ft) in diameter placed 30 cm (1ft) below the frost line. Concrete piers are poured on top of the footings to extend 15 to 20cm (6 to 8in) above ground level. While the pier concrete is still wet, a post anchor is embedded in the concrete, which will later support the wood post. A concrete pier eliminates the need to bury the post in the ground and will prevent wood rot.
The convenient way to handle your concrete is to buy premixed bags, to which you add water following the instructions on the bag. One 18kg (40lb) bag of premix will provide about 1 cubic yard of concrete. Buy footing and pillar concrete molds at your building supply dealer.
Once the concrete has set with the post anchor in place, fit your posts into the anchors, level them, and nail the boards in place. Attach braces to support the posts while you construct the deck.
Next, install the ledger board to your house. This 2×8 board is fastened into the studs or masonry of your house, eliminating the need for a row of footings and posts. The ledger is levelled and fastened securely to the house. Make sure the ledger is fastened below the door threshold at a distance equal to the width of your deck planking.
Once the ledger is fastened, you can accurately measure for the height of your posts. The posts you’ve already attached to the pillars should have enough excess height on them to allow cutting. This will ensure a level deck over the uneven ground. Place a nail at the bottom of the ledger board, in line with the row of posts. Run a string from the nail to the last post, levelling the string with a line level. Mark the posts at the string.
Before you cut your posts, you’ll need to determine the method you’ll use to attach the beams. The first method is to attach a 2 x 12 beam to each side of the post, bolting the beams together through the post. If this method is used, the mark you’ve just placed on your post will be the cut line and is also the placement line for the top of the beams. The other method is to place the two beams together, fitting them into post caps at the top of each post, then nailing through the post cap into the beams. If you choose this method, a new cut line will have to be established on the post, down from your original mark the width of the beams.
To prevent lateral movement of the deck, brace the post and beams using a 2 x 4 nailed at a 45 angle between the post and the beam.
Measure and mark where the joists will cross the beams and butt against the ledger. These marks will indicate where the joist hangers will need to be nailed to the ledger and where the beam saddles will be nailed to support the joists over the beams. Use the beam saddles and joist hangers for securing the joists instead of toe nailing the boards. Nailing will provide a weaker fastening than the hangers and saddles. Make sure your building code has been followed for the proper joist spans.
Each end of the deck has a joist fitted to it, and another joist header or deck skirting board is attached to the open end of the deck to hide the joist ends.
You’re now ready to lay your deck planking. Start at the ledger, laying the first board over the top edge of the ledger then proceeding along the deck, spacing the boards about 60mm (1/4in) apart for drainage. Use two nails to fasten each plank at each joist.
Building codes will often require a railing around the deck. This railing is usually about 91cm (3ft) high and can be built by adding posts and rails after the main deck is finished or, in the original construction, by extending the posts from the concrete pillar up through the deck to a height 91cm (3ft) above the deck floor. Railings added after the deck has been built should have the posts bolted into place.
If you need to add a stairway to your deck, make sure the treads are at least 22cm (9in) wide and the distance between the risers is no more than 20cm (8in). Whatever size you select, make sure the size remains the same for each step. Pour a concrete slab about 12cm (5 in) thick the width of your stairway at the bottom of the steps. The bottom of the stringers will rest on this slab, while the top of the stringers are attached to the deck with framing anchors. Bolt 2×2 cleats to the stringers for the treads to rest on. Measure and level carefully before fastening the cleats. Cut the 2×12 treads and nail them to the cleats. The deck railing should also be continued down the steps for safety.
RAILINGS
Railings are often required by building 1m (3ft) high. A railing can be addedcodes and usually the railings must be during or after original construction.
DECK STAIRWAY
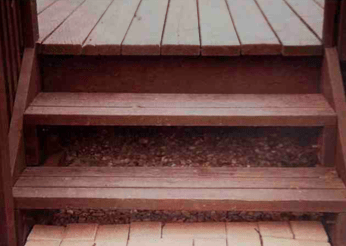
The bottom of a deck stairway sits on the top is attached to the deck. Treads a 12cm (5in) thick concrete slab while rest on cleats fastened to the stringers.
Maintaining the deck
The use of pressure-treated wood will guarantee that your wood will be resistant to rot and decay, the natural enemies of wood. Redwood or cedar is also rot-resistant but, as mentioned earlier, these types of wood are more expensive than pressure-treated wood and more difficult to find now that lumberyards seem to prefer stocking the treated wood.
If you like the green cast of the pressure-treated wood, no further finish need be added to the deck. However, for extra protection, or to change the color of the wood, you could either spray or brush on some stain. Never paint a deck. Paint will not stand up to the wear that a deck receives and will soon crack and chip, creating the need for frequent repainting. Besides, if you’ve gone to all the trouble of building a deck out of wood, why not show off the beautiful grain?
You can finish your deck with an opaque stain which penetrates the wood and reveals the wood texture. However, the wood grain will be covered up by the solid pigments of the opaque stain. If you want both the texture and the grain of the wood to show through, use a semi-transparent stain.
Make sure the stain you buy is a penetrating water-repellent stain suitable for outdoor deck use. And try to buy a stain that resists mildew as well.
Unlike paint, which will likely need to be recoated annually and will also need to have the damaged paint coat scraped off before applying a new finish, stains will last from two to three years, perhaps longer depending on use, and can be renewed simply by washing the deck and restating. Never use a varnish on a deck, for the same reasons that you wouldn’t want to use paint. The varnish will chip, blister and peel and would need to be removed completely before you could restain.
To keep your deck clean, especially if you’ve stained with a dark color (footprints tend to leave gray marks on a dark-colored deck) use a stiff-bristled brush and scrub with a mild detergent. Hose the deck down to rinse off the detergent.