Marking up Gauges (in Sets)
One of the biggest mistakes that people make when marking up gauges is to do them one at a time. I have seen many trainees and inexperienced roofers scratching their heads and wondering why the top roof batten is running out by 30 or 40mm when they have checked the roof and all the roof battens and then just cannot find the error. What has normally happened is that they have marked one roof batten at a time and have made a number of tiny errors of 2 or 3mm each time they have transferred the tape. Marking gauges in sets saves time and is more accurate. For example, the maximum gauge for plain tiles on a pitched roof is normally 100mm. This means that there are ten courses per metre. If the roof is 5m long there will be around fifty courses. Marking one at a time means that there are fifty chances to get it slightly wrong. Theoretically, if one side of the roof is marked at 101mm and the other side at 99mm, then the roof could run out by 100mm, which is equal to one full course of tiles. Normally it is possible to fit about eight plain or nine tile courses on each strip of underlay, so this means that the same roof could be marked in six sets (multiples of 100mm). Suddenly there are fewer chances to make mistakes. Now, even if every set is out by 2mm (one high, one low) the roof battens will run out by only 10 to 12mm.
In reality, plain tiles are not normally a problem because the gauge is so simple, but I have used them as an example because the high number of courses makes it easier to illustrate the point about the risk of mistakes. The problem comes mainly in tiles and slates with gauges that can be adjusted, or if the gauge is an awkward one (for instance, 328mm rather than a neat 330mm). The fact is that all slate and tile gauges should be marked up in sets irrespective of the gauge; we shall cover this further in the product-specific sections.
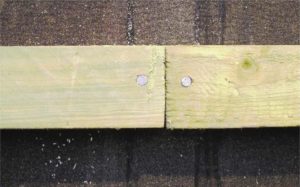
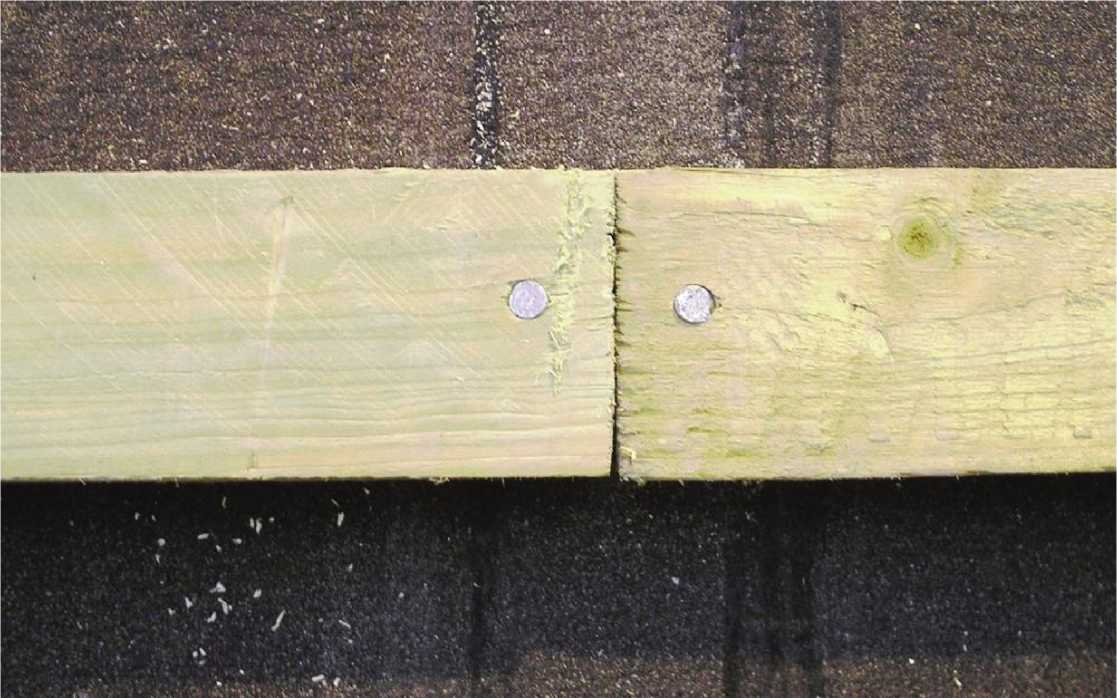
Batten joints and nails should aim for the centre of the rafter.
Cutting and Fixing
General
Apart from the narrowest parts of a hip or valley, roof battens sections should be at least 1200mm long and span two rafters (three fixing points). When jointing roof battens, they should be neatly sawn and fixed on to the centre of the rafter with the nails angled slightly inwards. Always try and nail close to the central point where the batten crosses over the rafter, this avoids unwanted splits and missed fixings.
Joints
When working on trussed roofs, it is important that the joints be regularly staggered (that is, not all in a line) to brace the roof for added strength and to avoid splitting the truss. The rule is that no more than one in four joints should be on the same rafter for gauges over 200mm (for instance, interlocking tiles) and no more than three in twelve for gauges under that (for instance, medium or small slates and plain tiles).
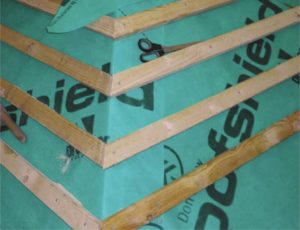
If you are working on a traditional ‘cut’ roof the rafters are normally a good deal wider than the trusses and the whole structure is independently stronger, so there is no real necessity to stagger the joints. However, to be on the safe side I would still advise some staggering of the joints. The simplest way to do this is to move the line of the joints to another rafter for each new strip of underlay.
Roof battens should be fully supported and nailed at hips.
At Hips and Valleys
At the hips, the batten ends should be cut to an angle, be fully supported by the hip rafter or timber noggins and securely nailed. The treatment at valleys depends much on the formation, but the same rules apply in that the ends should be angled, supported and securely fixed. Ideally, all valley construction details should include noggins. These are supporting timbers set back parallel to the centre of the valley and which provide excellent fixing points for the batten ends. Unfortunately, this is one ‘luxury’ that does not arise nearly often enough now, so the only alternative for most roofers is either to install the noggins themselves or to ‘skew’ nail into the sides of the roof battens or valley boards.
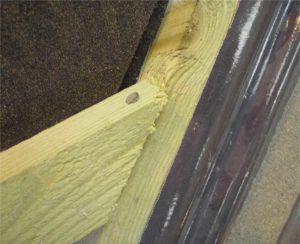
Where noggins are not provided, skew nailing may be the only option.
At Verges
Where batten ends are cut at a mortar-bedded verge, the ends should typically finish 25-50mm back from the edge of the undercloak and be treated with a suitable wood preservative. This is not necessary for dry verge.
Fixing to Masonry
Occasionally, you may need to fix to walls, especially if you are doing some vertical plain tiling to gable ends. Normally, the best way to do this is not to try and batten straight to the wall, but to drill, plug and screw counter battens to the wall first. The maximum centres (that is, the spacing between corresponding edges) should be no more than 450mm. The battens can then be fixed as normal.
Counter Roof Battens
Counter battens are timbers (normally 25mm to 50mm in depth) fixed in line with the rafters before the normal battens are installed. The main purpose of counter battens is to increase the flow of air in the roof and thereby reduce the risk of condensation. Counter battens tend to be specified mostly on roofs that are insulated at rafter level (over rafter insulation boards or between rafter insulation set down to rafter level). Whether the counter battens go on before or on top of the underlay depends largely on where the airflow needs to be directed, so you should always check the specification.
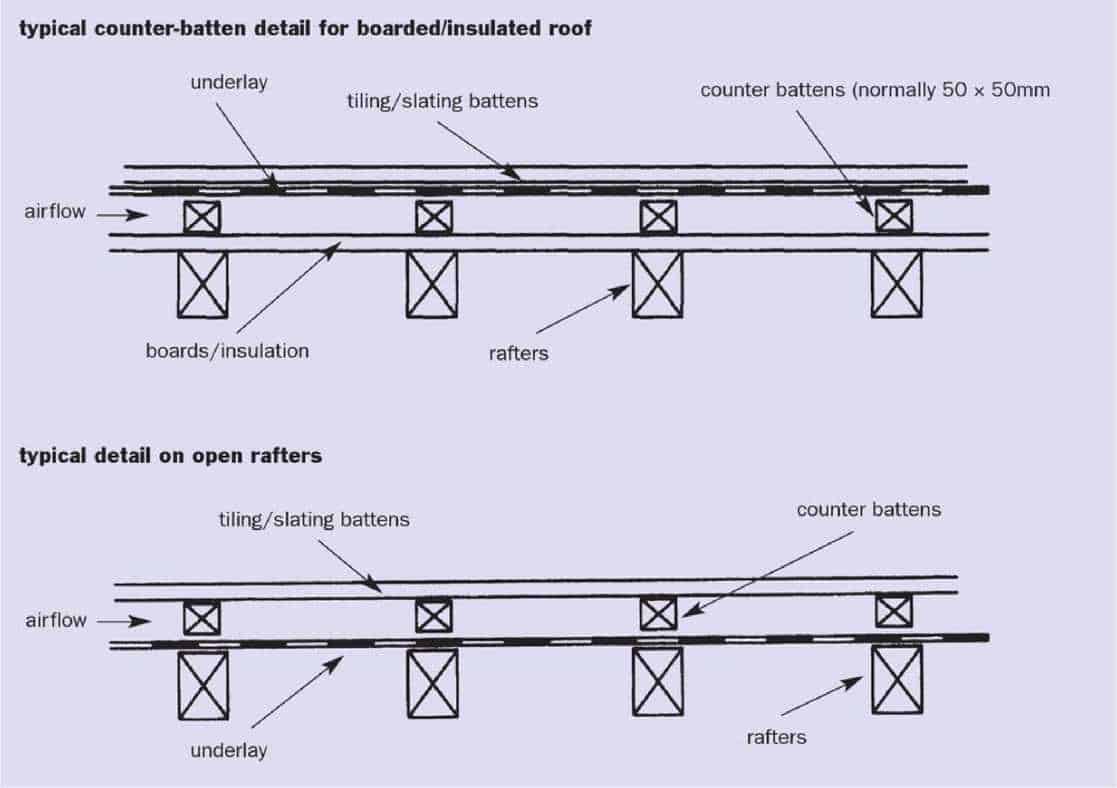
Counter battens under and on top of the underlay.